Even wondered what is rebase and when to use it. On today’s topic we will cover it and give you a few use cases.
Git is a powerful version control system that allows developers to collaborate on code and keep track of changes. One of the most useful features of Git is the ability to merge changes from one branch into another. However, sometimes merging changes can lead to messy and confusing commit histories, which is where Git rebasing comes in.
Git rebasing is the process of moving the base of a branch to a different commit. This can be useful in a variety of scenarios, such as:
- Keeping a clean commit history: When working on a feature branch, you may have made several small commits that aren’t meaningful on their own but are important for the overall feature. If you want to merge your changes into the main branch, you may not want to include all of these small commits in the history. Rebasing allows you to squash these commits into one or a few meaningful commits, making the history cleaner and easier to understand.
- Incorporating upstream changes: If you’re working on a branch that is based on an older version of the main branch, you may want to incorporate the changes that have been made to the main branch since you started working on your feature. Rebasing allows you to move your changes to the top of the main branch, so you can be up-to-date with the current codebase.
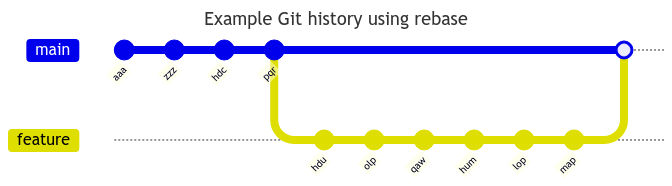
Examples:
#1 – On the image bellow we can see that feature branch was created and while we where working on it, the main branch was updated with 3 new commits which we needed in our feature branch before continuing working on our feature. On this case, merge strategy was used:

#2 – On the image bellow we have the same scenario, but instead of merging, we rebased against main branch which moved our branch to the head of main and created a cleaner version.
Noticed something different on feature branch? commit ids changed! when we rebase a branch, it creates new hash id for each of the commits on your branch, this is because, git does some magic under the hood, which you can explore on this article. This is why, YOU SHOULD NEVER REBASE ON BRANCHES USED BY OTHER DEVELOPERS as doing so will create several conflicts when merging, or sync changes. You can mitigate this problem by warning your teammates in which case they should reset their local versions of the branch and update any sub branches with the newest version, but again, I guess you should have figured the headache that this would be at this point.
Now that we’ve talked about when to use Git rebasing, let’s take a look at the different rebasing strategies:
- Non-interactive rebase: Non-interactive rebase allows you to move your branch to the top of another branch without making any modifications to individual commits. To perform a non-interactive rebase, use the command git rebase <base branch>.
- Interactive rebase: Interactive rebase allows you to manually select and modify individual commits in your branch. This can be useful if you want to squash multiple commits into one, edit commit messages, or reorder commits. To perform an interactive rebase, use the command git rebase -i <base branch>.
- Rebasing with merge commits: Rebasing with merge commits is a strategy that allows you to incorporate changes from another branch while preserving the merge commit history. This can be useful if you want to keep track of which changes were merged together. To perform a rebasing with merge commits, use the command git rebase –preserve-merges <base branch>.
Let’s take a look at some examples of when to use each rebasing strategy:
- Interactive rebase: Let’s say you’re working on a feature branch and you’ve made several small commits that aren’t meaningful on their own. You want to squash these commits into one or a few meaningful commits before merging into the main branch. To perform an interactive rebase, use the command git rebase -i HEAD~<number of commits>. This will open up an editor where you can select and modify individual commits.
- Non-interactive rebase: Let’s say you’re working on a feature branch that is based on an older version of the main branch. You want to incorporate the changes that have been made to the main branch since you started working on your feature. To perform a non-interactive rebase, use the command git rebase origin/main. This will move your branch to the top of the main branch, so you can see how your changes integrate with the current codebase.
The perfect workflow for rebasing:
- Rebase only the branch you are working on, never on a shared branch.
- You should frequently rebase against your base branch to have the latest version of the project and also make sure to do it before creating a pull request.
- If working on a long living feature branch as a base and updating with main is required, it is preferred to finish any work on the sub-branches and merge them before rebasing the feature base branch and creating any new sub-branch, otherwise, you or your team will need to cascade the rebasing, this is: rebase feature branch against main and then rebase each sub-branch from the feature branch.
Hopefully you enjoyed this article! My mission is to spread my knowledge, if there is any mistake or room for improvement on this article, just ping me via any of the methods on my about section.
Thanks for reading,
César.
Leave a Reply